How to Make a Origami Necktie
Money Origami Shirt and Tie Instructions

Fold a Money Origami Shirt and Tie with my easy step-by-step instructions. A money shirt makes a cute way to give a cash gift or leave a tip :-)
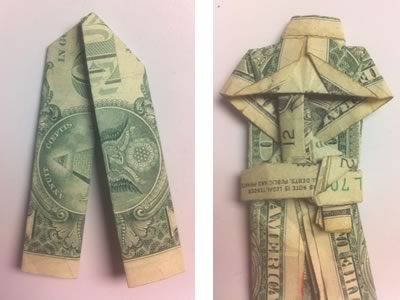
The combined shirt and necktie is folded from a single bill. Here's one I folded from a $20 bill:
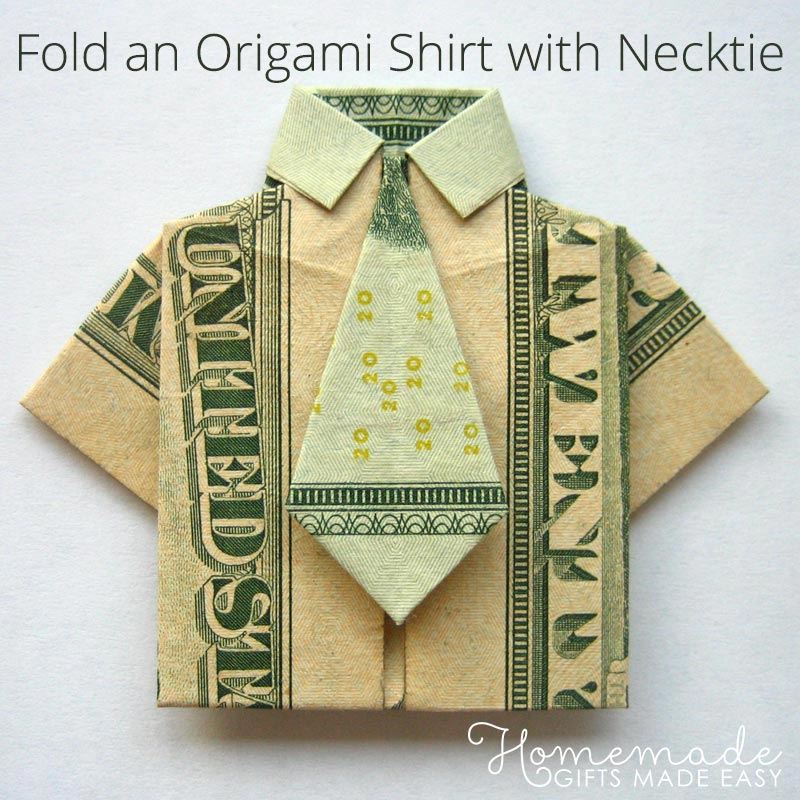

The original inventor of the design is Stefan Delecat .
It's easiest to use United States money for making this shirt. USA bills are 6.14 by 2.61 inches, which is quite long and slim compared to money from some other countries. If you want to use money from other countries , you might need to fold in the edges first to make the note skinnier. One of our readers explains...
Non-USA currencies
"I'm in the UK and regularly make this model with all of our Bank Notes! The trick is to fold about 5mm of the long edges in, thus making it about the same proportions as the USA Dollar Bill. The extra thickness doesn't matter as it ends up in the middle of the model. I carry an "Emergency" £20 ready folded, just to show off!"
~ Kriss :-)
The money origami shirt and tie on this page is a little tricker to make than the shirt without a tie. I'll show you the video tutorial first. But further down the page there are also step-by-step photo instructions . They're handy if you that have a slow internet connection, because they load much faster than the video.
You can also fold an origami shirt and tie out of regular paper - just start with a sheet of paper that's 2.35 times as long as it is wide. I've seen people make some really neat homemade Father's Day cards with a folded paper shirt on the front. And we've got lots of great father's day quotes, messages, and poems to help you write a great card to your Dad.
The origami shirt and tie makes a neat gift:
Origami shirt birthday gift
"I made the shirt and tie from a $50 for my 16 year old nephew's birthday; I made the paper box and put the "shirt" inside. He kept asking during his party what I got him, I told him a shirt and tie. All his friends wanted to know how I got it in the tiny box. I told them to wait and see. They kept saying, it's not a shirt, I said yes, it's a green shirt and a tie.
Needless to say, everyone was amazed that there was, in fact, a green shirt and tie in the box.
And I was more amazed that my nephew thought it was cool and did not immediately undo the shirt and put it in his wallet. Thanks for the website!"
~ Janet
Money Origami Shirt and Tie Video Tutorial
Click the image below to play.
If the video keeps stopping and starting, then the best thing to do is pause it and come back in a few minutes when it's fully loaded. Or, just skip to the photo instructions below.
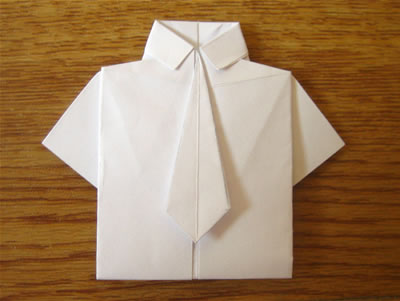
Money Origami Shirt and Tie Photos
If the video is taking too long to load on your internet connection, you might prefer these photo instructions. I've used a white sheet of paper instead of a bill, so that you can see the folds more clearly. I've also marked all the folds in red.
Step 1:
Fold the bill in half lengthwise, then unfold. Here I've shown the orientation of the bill to start with if you want it to end up looking like mine.

Step 2:
Fold the top two corners to the center crease, as if you were making a paper plane. Then, fold down the triangle that you've created.

Step 3:
Use a pencil and ruler to sketch in the shape of a necktie onto the triangular flap. You can make the tie as wide or skinny as you like, so long as the lines you draw meet in a point at the top edge of the paper.

Step 4:
Unfold the triangular flap, so that the paper looks like the left panel below. Then make creases along each of the pencil lines you drew in step 3.

Step 5:
Fold the triangular flap back down, so that the paper looks like the left panel below. Now fold the necktie in half (top right panel). This will make the top left edge of the paper lift up (see middle right panel), so squash that top left edge flat again, making a new crease in the process (see bottom right panel).

Step 6:
Open out the necktie again by folding along the crease shown below.

Step 7:
Repeat steps 5 and 6 on the other side. The paper should now look like this. You can see the necktie already!

Step 8:
Fold the left and right hand edges in to meet the center line.

Step 9:
On the left hand side, undo the fold you made in step 8. Then redo the fold, but this time make left *-corner meet the right *-corner.

Here's another view to make it a bit clearer:

Step 10:
Repeat step 9 on the right hand side. Then fold up the bottom edge about 1/4" (about 1/2 cm) from the bottom, like this.

Step 11:
Turn over the paper. Now we'll make the collar of the shirt. Fold the bottom two corners in at an angle to meet the center line. See how it looks like a shirt collar, but upside down?

Step 12:
Turn over the paper, so that the necktie is on the top again. Fold up the bottom so that the collar almost reaches the necktie. It should be about 1/8" (3 mm) short of touching.

Step 13:
Now we'll make the sleeves of the shirt. Undo the fold from step 12. Then redo it, but this time pull the two flaps shown outward. See how they stick out to the side? They'll be the shirt-sleeves.

Step 14:
Turn over the paper. Fold in half, so that the corners marked * touch each other.

Step 15:
Fold up the collar, so that it just peaks over the top of the shirt.

Finished!
Hook the collar over the front of the shirt, and it should look like this:
How did your money origami shirt and tie turn out? I hope you found my instructions clear. If you have any comments or suggestions or just want to say hi, please contact me with this handy form .
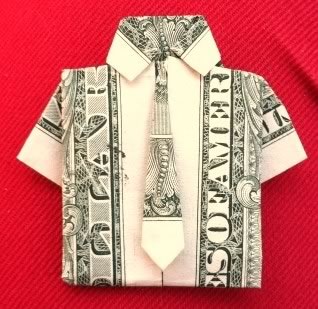
Here's a photo of a finished money origami shirt and tie sent in by reader Nikki. Thanks for sharing your photo Nikki!
Variation: Money Origami Suit
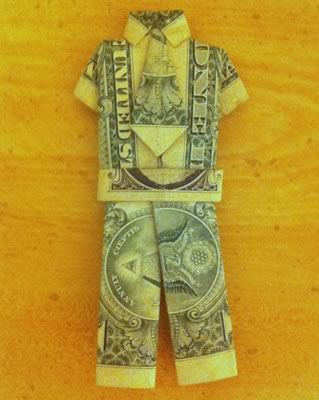
Reader Mike says...
"I just wanted to share my dollar bill suit that started with your money origami shirt and tie piece. I used three bills total to complete. I'm pretty happy with how it turned out!" ~ Mike
Mike also sent in a couple of extra photos showing how he made the trousers and belt:
Left: To make trousers, fold a bill in half lengthwise twice to make a skinny rectangle, then folder in half to make two legs.
Right: Make belt folding a bill into a really skinny rectangle. Then use the belt to "tie" the trousers and shirt together. This photo shows the "knot" at the back.
Thanks for sending in your photo Mike!
Variation: Origami suit with guitar and Abe Lincoln head
Another awesome contribution from Mike...
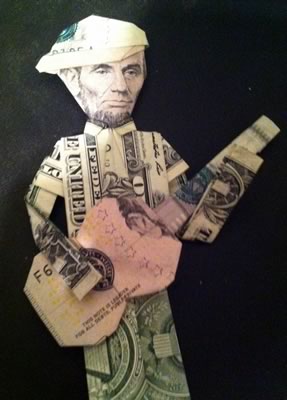
"I sent you an email a while back with my creation of pants and belt to go with the shirt and tie. I found a site to make a guitar and another to make Lincoln in a hat. Put it all together, added some simple arms and got something quite unique and adored by all my friends. Figured I'd share."
~Mike
And here's one from reader Alicia:
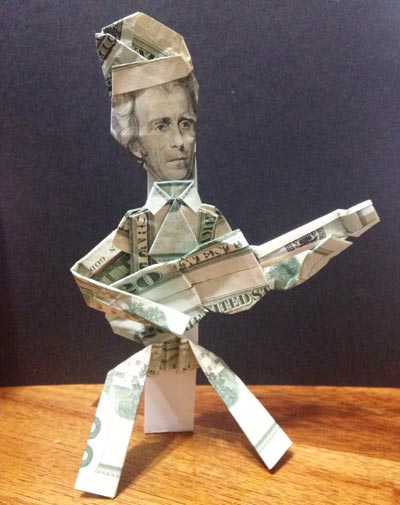
Thanks for the awesome tutorial! I found the guitar somewhere and then made up the rest!
~ Alicia
Variation: Origami Suit and Dress
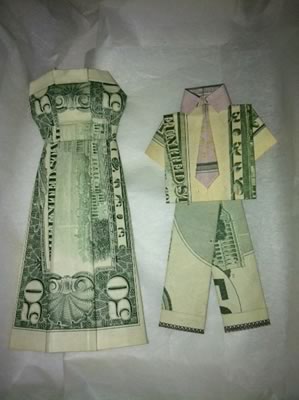
Reader Sue says...
"Thanks for the origami shirt and tie instructions! Much nicer than the plain shirt. I've been giving wedding gifts of a money origami wedding dress, shirt and pants (3 bills) lately and this "classed" it up! I found the dress instructions on this blog , and altered the dress slightly to make it longer like a gown. " ~ Sue
Thanks for sending in your photo Sue - what a great idea for a wedding present!
Reader Thomas says...
"My wife has been telling me she wants to buy new clothes and update her wardrobe. I didn't want to just give her lame cash, and heaven knows I can't pick out anything she'll actually wear, so your how-to on the money origami shirt and tie was perfect! I also looked around a bit and made a dress - who knew I could hand-make a couple of outfits my wife is guaranteed to like?!" ~ Thomas

Card says: "We've had our finest elves working extra hours on some outfits for you. We hope you like them! -Santa and Mrs Claus"
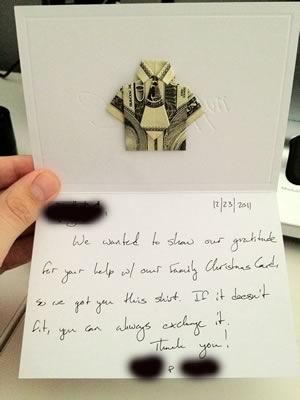
"...I also got so inspired I made an origami shirt and tie for a coworker as a thank-you for a special project he did for me." ~ Thomas
Card says: "We got you this shirt. If it doesn't fit, you can always exchange it."
Thanks for sending in your photos Thomas!
After seeing these photos from Sue and Thomas, my husband Tobias was inspired to have a go at making his own origami dress, and came up with this alternative design:

Click for money origami dress instructions
You might also like...
Here are some other pages I think you might enjoy:
Or have a browse through dollar origami books on Amazon.com
We may earn a commission for purchases using our links, as described in our affiliate disclosure.
Happy Gifting!
Source: https://www.homemade-gifts-made-easy.com/origami-shirt-and-tie.html
0 Response to "How to Make a Origami Necktie"
Post a Comment